
By JSON Web Token (JWT)
Let's learn about JWT and how to use it on All That Node!
What is JSON Web Token?
JSON Web Token (JWT) is an open, industry standard RFC 7519 method for representing claims securely between two parties. You can enable JWT in All That Node and send requests with JWT to ensure only authorized requests go through. <an excerpt fromhttps://jwt.io>
When should you use JSON Web Tokens?
JSON Web Tokens (JWTs) provide a secure method of exchanging information between different entities. By employing techniques such as signing with public/private key pairs, JWTs offer assurance regarding the authenticity of the senders. Furthermore, the inclusion of the header and payload in the signature calculation allows for the verification of data integrity, ensuring that the content has not been altered.
How to use JWT with All That Node projects?
It may look complicated, but it's not. We’ll walk you through successfully setting up JWT.
Available Limitation: You can add up to 25 JWTs for one project.
Step 1. Generate the private/public key pair
- Generate a key pair that conforms to the RS256 or ES256 algorithm . You can use tools such as openSSL.
- Example of creating the private / public key pair
openssl genrsa -out private.pem 2048
openssl rsa -in private.pem -outform PEM -pubout -out public.pem
openssl ecparam -name prime256v1 -genkey -noout -out privtemp.pem openssl pkcs8 -in privtemp.pem -topk8 -nocrypt -out private.pem openssl ec -in private.pem -pubout -out public.pem
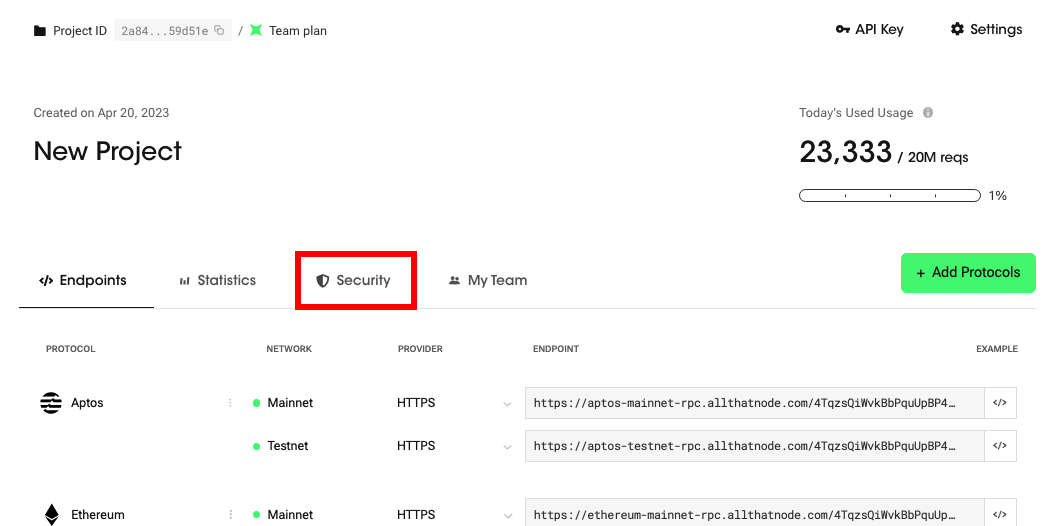
Step 2. Upload the public key to your project dashboard
If you register at least one public key, a request without a JWT fails.
- Go to the "Security" menu on your dashboard.
이미지 변경 필요!!
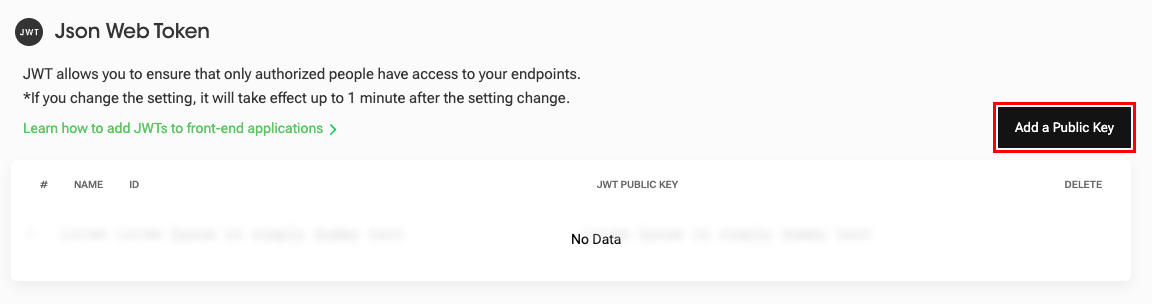
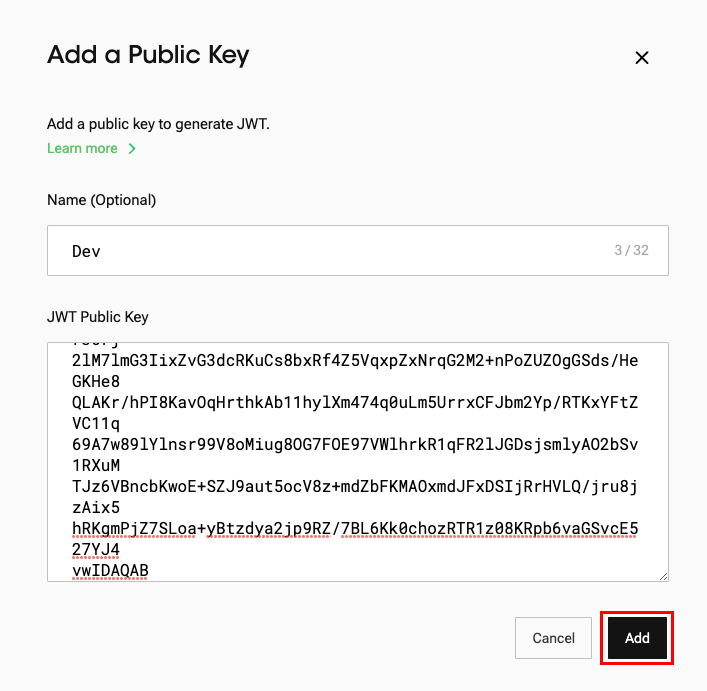
- Click the "Add a Public Key" button.
- (Optional) Enter a name.
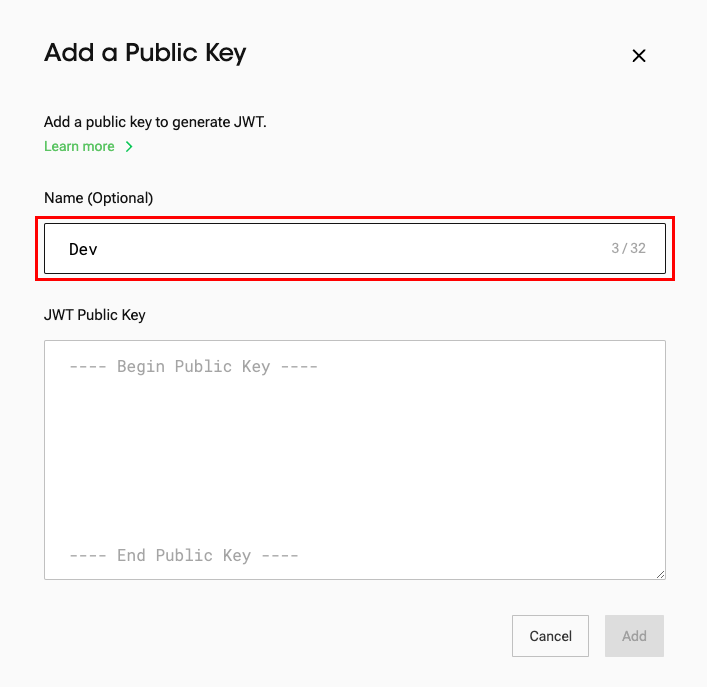
- Upload the public key that you generated above to the “JWT Public Key” section.
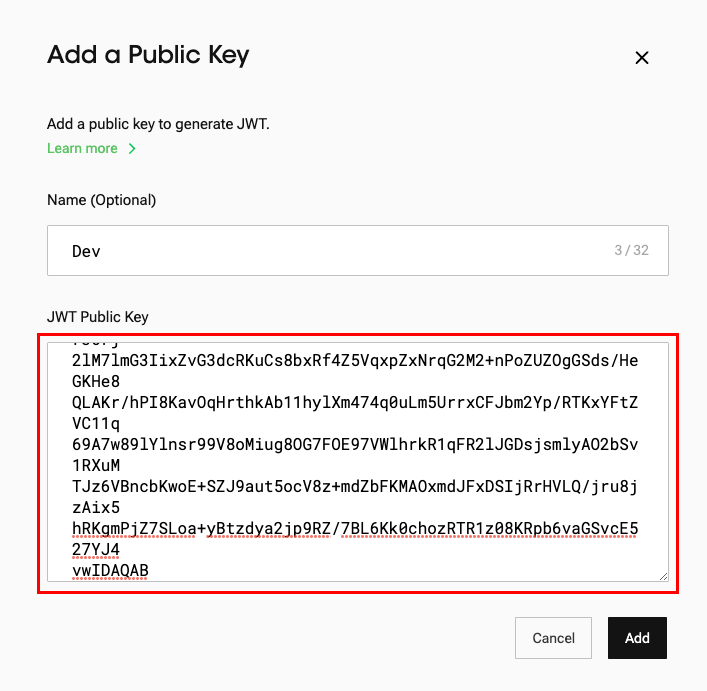
- Click "Add" to register your public key.
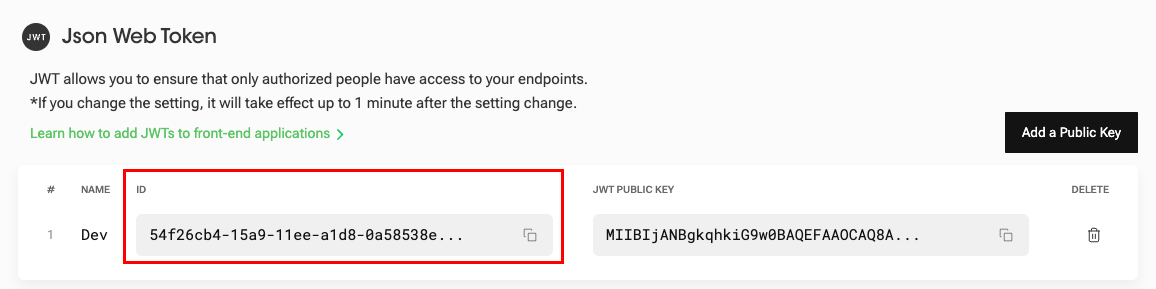
- Check the "Id" of your public key is added to the list in the security settings. It is used as the "kid" (Key ID) for generating the JWT.
Step 3. Generate JWT
You have to set header, payload, signature to generate a JWT. Visit here for more examples!
Those 3 parts make up the JWT and are separated by ".". Thus, JWT looks like:
aaaa.bbbb.cccc1. Header
{
  "alg": "RS256",
  "typ": "JWT",
  "kid": "54f26cb4-15a9-11ee-a1d8-0a58538e0d0c"
}| Object | Example | Description |
|---|---|---|
| alg | “RS256” | The signing algorithm being used. RS256 or ES256. |
| typ | “JWT" | The type of the token you are going to generate. |
| kid | "54f26cb4-15a9-11ee-a1d8-0a58538e0d0c” | The public key "Id" from All That Node Dashboard. |
2. Payload
{
  "exp": 1719511840,
  "nbf": 1687834195,
  "aud": "allthatnode.com"
}| Object | Example | Description |
|---|---|---|
| exp | 1719511840 | (Optional) Expiration timestamp for the JWT. (Unix timestamp) |
| nbf | 1687834195 | (Optional) The JWT is valid only after the current time. (Unix timestamp) |
| aud | "allthatnode.com" | (Optional) If this audience option exists, the token is valid only when the value ends with "http://allthatnode.com/ ", case-insensitive |
Is it mandatory?
The presence of "exp," "nbf," and "aud" fields in the JSON Web Tokens (JWTs) is not mandatory. The JWT will be accepted without any further inspection if the optional fields "exp," "nbf," and "aud" are not present in the token.
3. Signature
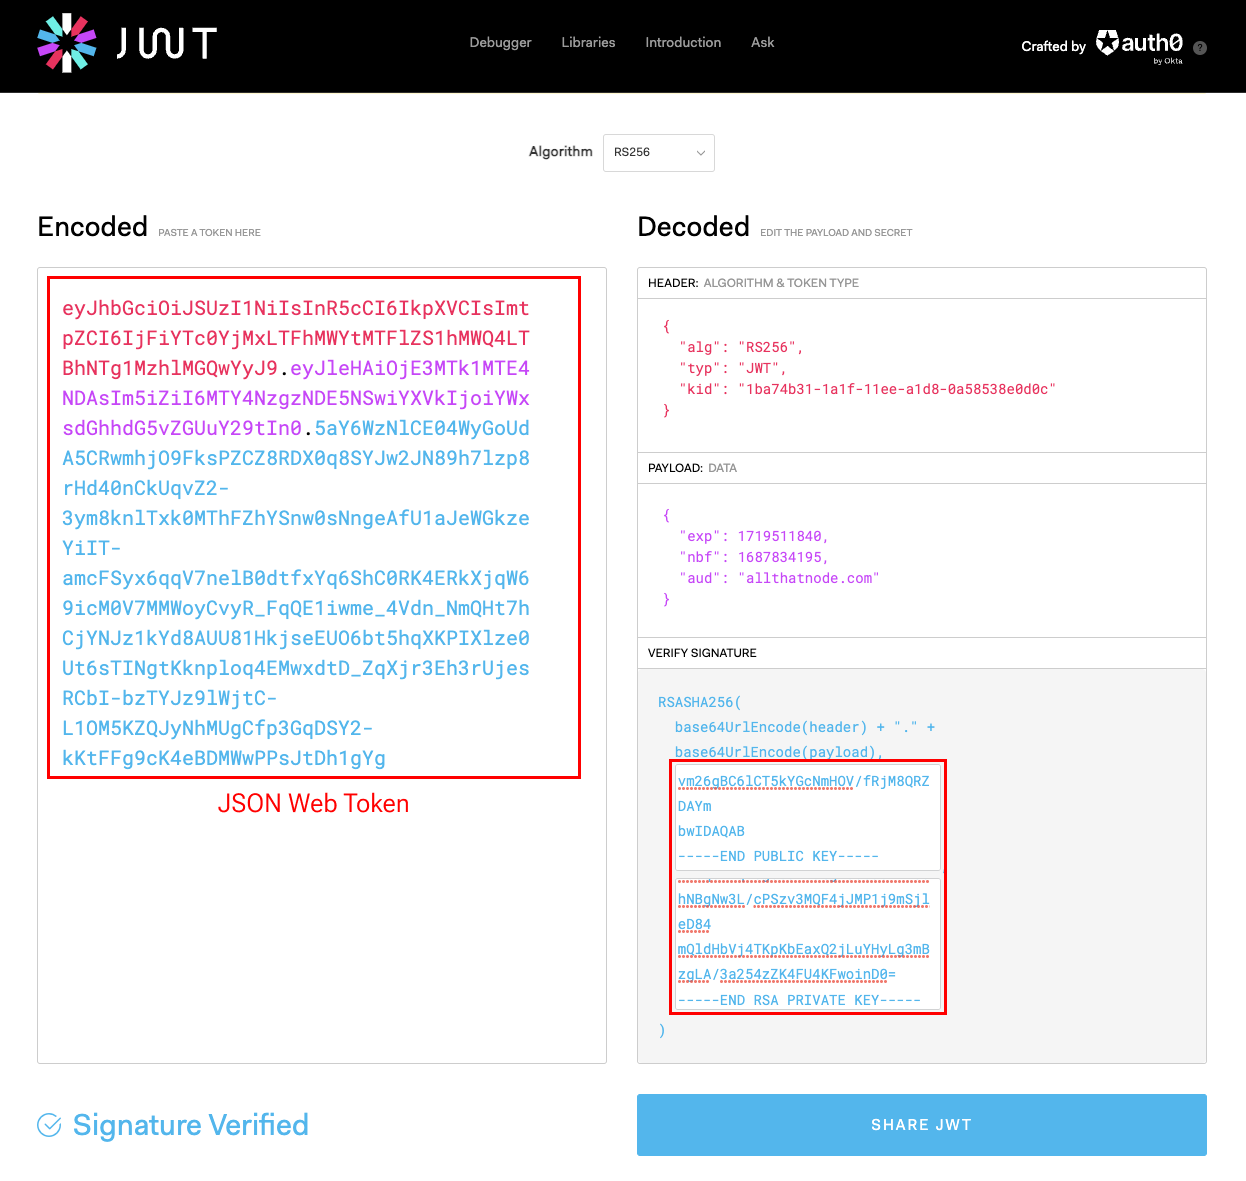
To create the signature part of the JWT, you have to encode the header and payload according to the JWT specification and then sign them.
Tip: You can generate JWT easily here! 😎
4. Send a request with JWT
Almost finished! When you send a request, remember to add the generated JWT to the head of request otherwise the request will fail.
Please put the JWT in Authorization HTTP header. You can use curl with -H "Authorization: Bearer <YOUR_JWT>"
curl -X POST \
-H "Content-Type: application/json" \
-H "Authorization: Bearer  <YOUR_JWT>" \
--data '{"jsonrpc": "2.0", "id": 1, "method": "eth_blockNumber", "params": []}' \
"https://ethereum-mainnet-rpc.allthatnode.com/<YOUR_API_KEY>"
5. Error References
You might encounter following errors when you enable JWT settings.
- A JWT public key exists in the dashboard, but the JWT is not present in the request.
//Error Response Example
{"code": -32013, "message": "missing JWT token", "project": "2a8428f5a79b09aadff75a745397cf6d2f59d51e"}- A JWT exists in the request, but its format is invalid.
//Error Response Example
{"code": -32013, "message": "invalid JWT token (malformatted token)", "project": "2a8428f5a79b09aadff75a745397cf6d2f59d51e"}- A JWT exists in the request, but the "alg"(algorithm) is neither ES256 or RS256.
//Error Response Example
{"code": -32013, "message": "invalid JWT token (unsupported algorithm)", "project": "2a8428f5a79b09aadff75a745397cf6d2f59d51e"}- A JWT exists in the request, but the "kid" (ID in the dashboard) is missing in the JWT header.
//Error Response Example
{"code": -32013, "message": "invalid JWT token (empty key id)", "project": "2a8428f5a79b09aadff75a745397cf6d2f59d51e"}- A JWT exists in the request, but the corresponding public key for the "kid" in the JWT header is not found in the dashboard.
//Error Response Example
{"code": -32013, "message": "invalid JWT token (empty configuration)", "project": "2a8428f5a79b09aadff75a745397cf6d2f59d51e"}- A JWT exists in the request, but the JWT signature is not valid.
//Error Response Example
{"code": -32013, "message": "invalid JWT token (signature verification failed)", "project": "2a8428f5a79b09aadff75a745397cf6d2f59d51e"}- A JWT exists in the request, but the JWT has expired - the expiration time (exp) has passed.
//Error Response Example
{"code": -32013, "message": "invalid JWT token (expired token)", "project": "2a8428f5a79b09aadff75a745397cf6d2f59d51e"}- A JWT exists in the request, the "nbf" (not before) time has not passed. - Current time is before the "nbf".
//Error Response Example
{"code": -32013, "message": "invalid JWT token (not reached nbf)", "project": "2a8428f5a79b09aadff75a745397cf6d2f59d51e"}
FAQ
Q: I want to force the issued JWT to expire.
A: If you suspect that the issued JWT might have been compromised and you wish to prevent its usage, you can remove the corresponding public key from the security settings within your project.
Q: Which cipher does All That Node support?
A: For now, All That Node supports RSA 256(RS256) and ECDSA 256(ES256), as specified in RFC7518 table 3.1.
Q: Can I add multiple JWTs to a project?
A: You can activate up to 25 JWTs on a project at once.
Q: My requests return 403 errors.
A: The 403 error indicates that the server understood the request, but it refuses to authorize it. There are a few potential reasons for this error:
- Invalid JWT format: Ensure that the JWT included in the request header is correctly formatted according to the expected specifications. Verify that the header, payload, and signature are properly constructed.
- Expired JWT: Check the expiration time (exp claim) of the JWT. If the JWT has exceeded its expiration time, it will no longer be considered valid for authentication.
- Security settings: If you have enabled additional security measures in your project, such as IP blocking or other access restrictions, make sure your requests comply with these settings. If your IP address has been blocked or restricted, you may encounter a 403 error.
Updated about 1 year ago